Showing posts with label Stampin Up. Show all posts

Monday, June 20, 2011

Squigglefly Watermelon News

Okay, ready for some exciting news? I have been asked to participate on the Design Team for the Squigglefly Challenge Blog. Hurray! What is very cool about the Squigglefly store is that it houses images & sentiments by 43 seperate artist - now that's a lot of variety. Your sure to find something to suit your style.

As well, check out today's challenge over at the Squigglefly Challenge Blog. Today's challenge #103 Playing Favorites, choose your favorite image from the Squigglefly store for you project. And don't forget to say "hey" to all the New DT's. Now on to my card.

This gorgeous little sweetheart is Watermelon Bee by artist Cheryl Alger. Isn't she adorable. Reminds me of my little ones; what sweet, messy fun. It just screams "SUMMER" to me.

I played along with this fabulous sketch challenge #6 by fellow Tiddly Inker Jen over at @ her blog Deconstructing Jen. I am a huge fan of DP panels, so this was right up my alley.

The DP is all from Jillibean Soup: Watermelon Gazpacho & two coordinating circle Journaling Sprouts or tags. Of course my image is all done up with Copics, I also popped her up on dimensional. The sentiment and "love" heart are from retired SU set "Treat Yourself". Actually it was one of my very first stamp sets, I won it at an SU Retirement Party a few years back.

Submitted for the following Challenges:
Deconstructing Jen - Sketch #6
Frosted Designs - Journaling Tags
7 Kids College Fund - #23 Feeling Hot Hot Hot
The Rubber Cafe - Summer

Tuesday, October 19, 2010

There She Goes Again!

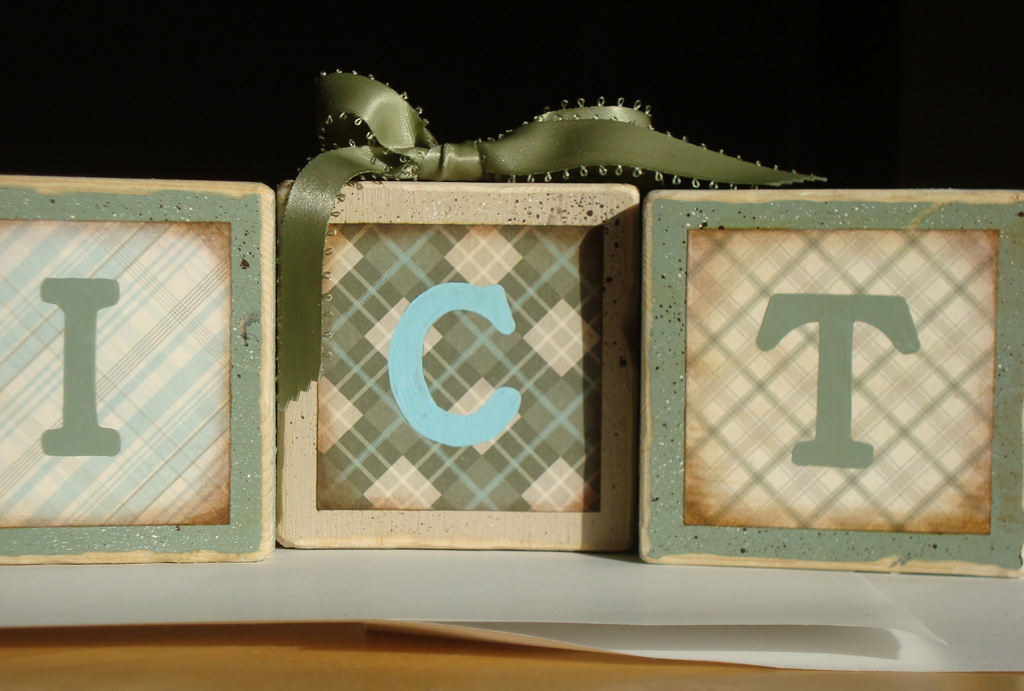
I can't stop coming up with ideas for these blocks. What a perfect baby gift for a neighbor who just had a little boy. I paper stained SU "Manchester" DP for the background and used paint for the lettering. Acrylic lettering would make this go a lot faster.


Using an old toothbrush, I speckle painted the blocks using brown and white paint before sanding the edges. I really like the effect.


The "HOME" blocks are a donation for my Local PTA Bingo Night.

I just love the bow detail.

Thursday, September 30, 2010

The Evolution of Rapunzel

I brained stormed last night and came up with a working layout for my Daughters Rapunzel invitation.
It's now a postcard style invitation.

I used Su - Crosshatch on the main body of the castle and the argyle from Su - Looks like Spring on the Turrets and Roof

Looks better then the free hand bricks on the mock up. I also have to tweek the Castle outline, I have noticed the it's not symmetrical. As well the light pink paper is from a random stack and is not quite thick enough quality for a postcard style invitation.

Stamps: Looks like Spring, All Year Cheer II, Crosshatch
Paper: Riding Hood Red, random pink
Ink: Ruby Red, Black, Versamark
Accessories: Nestabilities, jewel, ribbon, rickrack, flower decals

Wednesday, August 11, 2010

Quilled Flowers

I made these quilled paper flowers many years ago for a wedding gift craft I used to frequently give out. I have been pondering using them for a while now and was inspired by i{heart}2stamp.com - Jen's sample card for her August seventh's weekly sketch. I didn't follow the sketch, however, her flowers reminded me of my quilled paper flowers so I dug them out.

This is definitely not a card to put in the mail, there is much to much dimension to it.

The stamp is SU - Fifth Avenue Floral and the paper is DCWV - Blossoms & Butterflies

Tuesday, May 4, 2010

Casing Myself - Mothers Day

When I first made the card shown here, I thought it would make a good Mother's Day card layout. I ended up changing the image and sentiment. So I cased myself, it happens.

Details
Stamps: SU - Pocket Silhouettes, Studio G Clear Stamps
Ink:
SU - Not Quite Navy
Paper: SU - Urban Gardens, Not Quite Navy, Not Quite "Kiwi Kiss", Shimmery White

Wednesday, January 13, 2010

Valentine Mock Up

My husband surprised me for Christmas with the Sweet Centers stamp set and 1 pkg of sweet treat cups from Stampin Up.

This is the mock up for my daughters valentine's day card for her junior kindergarten classmates. I will pick up a couple of packages of the pink and red Valentine themed Smarties (similar to M&M's) to colour coordinate, I just didn't have any on hand today.

At my daughters school board, like most school boards in Ontario Canada, only NUT FREE products made in nut free facilities can be sent to school. Smarties are one of the acceptable brands.

I used Flowerbug's Inkspot's idea of a tag slide inside the card to remove treats without destroying the card.

Gone INKognito has a layout using the tab slide in the front of the card mounted under what would be my dark pink mat, making the inside of the card look cleaner. I may play with this layout too to see what I like best.


Details:
Stamps: SU - Sweet Centers, Studio G Clear Stamps - 100% Sweet
Ink: Dollar Store - Pink pigment
Paper: SU - retired DP, white, pink
Accessories: Sweet Treat Cups, colluzle, round tab punch template

Monday, September 28, 2009

'Not Quite Baja' Christmas

I've been thinking that I would like to make up a small Christmas card set to sell at my daughter's school Christmas bizarre (if they have one) so, I sat down today with intentions of making a simple and easy to replicate card.

*Wish the sparkle would show up better in the photo*


This card looked very crisp and clean without any background images, but I have been meaning to use these flourishes by Inkadinkado for some time now.

If this is the chosen cards to make as a package, I will definitely go without the flourishes to make the mass production easier.

Get prepared for an early X-mas. I have half a dozen ideas already planned, although admittedly some duplication of layout.

Details:
Paper: SU: Not Quite Navy, Baja Breeze
Ink: SU: Not Quite Navy, Baja Breeze
Stamps: SU: All Year Cheer II, Inkadinkado: Dot Flourishes, Hero Arts: Diamond Snowflake, Crystal Snowflake, All About Winter, Christmas Tree Trimmings
Accessories: Skittles

Tuesday, July 14, 2009

Urban Silhouettes

Ever notice how the SU - Pocket Silhouette stamp set, lends itself to any occasion. I prefer the boldness of the Not Quite Navy card myself.

This layout is from FTL 49- Sketch found here @ Clean and Simple Stamping.


Details:
Stamps: SU - Pocket Silhouettes
Paper: SU - Urban Gardens, Not Quite Navy, Baja Breeze
Ink: Baja Breeze, Not Quite Navy, VersaMark
Accessories: Ribbon, clear EP, White EP

Tuesday, June 16, 2009

This card was inspired by a sample I saw at my SU Demonstrator's house (Jennifer Tinline). I love that she used the Top Note die to create an evening bag and had to try one myself.

The purse was done by using the SU Top Note Die cut on double sided paper. However I used two cuts and merged the pieces together

I made this little purse quite some time ago, but never got around to assembling a card face until this evening.

Details:
Stamps: SU - Pocket Silhouette : sentiment
Paper: SU - Washington Apple, Riding Hood Red, Bashful Blue, Summer Sun
Ink: SU - Ruby Red
Accessories: SU - scallop punch & top note die, dollar store looped ribbon & brad, SU - Bashful blue ribbon, Cuddlebug emboss folder

Wednesday, May 27, 2009

Copper Fathers Day

Lovely As a Tree was the one stamp set that I promised myself to purchase at my SU stamp club, and wouldn't you know it, I didn't bother ordering it until the last month. Perfect for Fathers Day though. Thanks goodness it arrived in time.


This card was super simple to make. Good to have those easy one's for when you are in a jam.

Details:
Stamps: SU - Lovely As A Tree, SU - All Year Cheer II
Ink: Versamark, Copper emboss powder, Color Box - Copper pigment
Paper: copper, black, Old Olive, Whisper White

Wednesday, April 29, 2009

Circle of Blooms

This is my entry for today's sketch challenge on Splitcoaststampers SC226

The Cracked Glass tutorial here. thee is islkjd

Details:
Stamps: Circle of Friendship, In Full Bloom, Botanical Blooms
Ink: Certainly Celery, Lavender Lace, Pretty In Pink, Apricot Appeal
Paper: Whisper White, Certainly Celery, Lavender Lace - I think, The Pocket Full of Posies matstack
Accessories: SU - Glassy Glaze, SU - flower punch

Tuesday, April 28, 2009

Mothers Day Window

Originally I had intended or attempted to make a single layer card with a window cut out. It evolved some and is no longer a single layer, but I am satisfied with the outcome.

I really love the new Sizzix - Butterfly die that I purchased from The Memory Keeper - that store is huge! I embossed each butterfly then used my VersaMark pen on the edges and the embossed areas. Stickles on the flowers added some sparkle. I find the marker has more control on embossed items with the pen rather then just swiping with the my VersaMark pad.

After I finished the card I realized why this colour combo seemed so familiar, it's the colour palette of my DD's room


Details:
Stamps: SU - Mixed Bouquet, SU - All Year Cheer II
Ink: SU: Certainly Celery, Blush Blossom, Appricot Appeal, Pale Plum & Lavender Lace, Versamak pen
Paper: Certainly Celery, Bashful Blue, Lavender Lace, Whisper White
Accessories: Cuddlebug Swirls emboss folder & Circles emboss folder, SU - Apricot Appeal ribbon, Nesstabilities, Sizzix - Butterfly die, and stickles.

Thursday, April 23, 2009

Botanical Thank You

My son's and my eldest daughters birthdays were this month, so I have a lot of thank you cards to send out - hence all the recent and up coming thank you cards.

Yesterday my new Spellbinders die came in as well as the embossing mat which I never got around to purchasing last year. How exciting. I had a lot of fun with it last night and am gonna poke around with it this afternoon too.

I finally used my SU - Botanical Blooms set which was one of my hostess rewards from my turn as hostess at Stamping Club last month. I was holding out on using it for Mother's Day, but I couldn't wait.

Studio G Clear Stamps Find:
I like to play around with the Studio G Clear stamps, particularly for sentiments. I find I can get a larger mix of sentiments purchasing them over the major brands, and they are usually fairly small sentiments allowing them to fit almost anywhere.

Just to share; I found a great eBay site with a whack load of Studio G stamps, which are hit and miss finding them at my local Michael's. If you are interested here is the link Ottclectic Impression - there were a lot of various holidays and many BBQ stamp sets.

Details:
Stamps: SU - Botanical Blooms, SU - Pocket Silhouette (sentiment)
Paper: SU: Kraft, Barely Banana, DS Delicate Dots
Ink: Memento - Tuxedo Black, SU - Bashful Blue
Accessories: Spellbinders die cut, SU - So Saffron ribbon (I think), Martha Stewart punch

Wednesday, April 22, 2009

Kraft Homage

This is my homage to Jennifer Bucks - The Buck Stamps Here "Late" design for the No Time to Stamp challenge "Thread it Through"

I have Kraft paper and the SU - Simply Silhouette stamp set, but instead of merely casing, I was inspired to create this card:

I have wanted to use this butterfly since my hubby bought me this set Inkadinkado- Garden Delight last year, but never knew how to use it since it was so large.

I had planned on stamping it in Memento Rich Cocoa then adding the image to a card with an orange and cocoa theme. However when I stamped the image out in just the Memento Rich Cocoa it reminded me of Jennifer's card and before I knew it, I had a monochromatic homage to Jennifer Buck's "Late".

I didn't have any coordinating DS to match so I created my own using the Stampendous - Tiled Quad Cube, also a gift from my hubby - ain't he grand!

Details:
Stamps: Inkadinkado - Garden Delight, Stampendous - Tiled Quad Cube, SU - Pocket Silhouettes
Ink: Memento - Rich Cocoa, SU - Whisper White pigment
Paper: SU - Close to Cocoa & Whisper White
Embellishments: Silver Brad, Mat Pack

Wednesday, April 8, 2009

Manhattan Breeze

There is a story behind this card. Last night I arrived at my monthly stamp club to find out that I was a week early. My SU Rep Jennifer Tinline was having a BIG SHOTS night and since it's a half hour drive for me, I decided to stay.

One of the projects we made last night was using the Manhattan Impressions Die on a full piece of vellum mounted with a ribbon at the top of the card - the whole card being covered in vellum. I had seen a very similar card on SplitCoastStampers using this Impression on vellum, but didn't know how the look was achieved. I had asked the designer, but had no response - I wish I had book marked the link.

At that time I had thought the Manhattan Impression plate was a die cut only, not an embosser. Once seeing the vellum embossed in person, Jenn and I played with the vellum and accidentally discovered that if you gently pull at the vellum on the edges, the vellum will tear away from the embossed edges giving the below effect. It gives an intentionally ragged edge look.

Now I know how the SplitCoast sample was achieved and so do you. I mounted the the vellum at the bottom of my card and covered the tape remnants with SU Organza ribbon. It's a very elegant effect with out a whole lot of work.

Details:
Embellishments: Manhattan Impression Die, SU Organza ribbon
Paper: Baja Breeze, vellum
Stamps: SU sentiment (not sure what set)

Monday, March 30, 2009

Fifth Avenue Eighteen

I originally just had the "Eighteen" as the sentiment. When I was finished the card I thought there was room for "happy", I think my english isn't correct though, seems like it should have said "happy eighteenth". I'll just tell every one I meant it like "sweet sixteen".

The background paper was stamped using SU Fifth Avenue Floral in white craft ink. The main flower was stamped in Versamark then heat embossed in Stampendous white emboss powder. the Eighteen is die but from SU Billboard alphabet.

Details:
Stamps: SU Fifth Avenue Floral, Anitas "happy" stamp
Ink: other brand Chocolate Chip, SU white craft ink, SU Pretty In Pink
Paper: Chocolate Chip cardstock, random pink cardstock, glossy white cardstock
Embellishments: Versamark, Stampendous - White emboss powder, Stampin Up! Billboard alphabet die cut, pink ribbon, brown ribbon.

Tuesday, November 25, 2008

Hedgehogs in the Snow

I adore these little hedgehogs. They are the reason I bought the "Bubbly" clear stamps set by Penny Black. I had been admiring these little critters for so long, but couldn't decide which "one" stamp of them to buy. When I came across a set with a couple of hedgehogs I had to have them.

I even finally used one of my SU - Circle of Friendship stamps, which I bought last summer at the Stamp Retirement party and had yet to even open.

I told you have been making a REALLY good effort to use stamps I already have, even the DP is left over from last years Christmas stock.

Details:
Stamps: Penny Black - Bubbly, Su - Circle of Friendship, and Hero Arts - Merriest Wishes (ornament & star)
Paper: Rhonna Farrer - Flourishes & Fun, Certainly Celery, and Riding Hood Red
Ink: Certainly Celery, Tombows
Accecsories: Colluzle circles, Skittles, SU - Scallop Punch, Ribbon

Monday, November 24, 2008

Christmas Case

I saw these cute little Santa gift tags by Vicki (It's a Stamp Thing) on Splitcoast over the weekend. She linked the directions to Heathers site (Stamp with Heather) There is a video with clear and super easy directions. I couldn't believe how easy these were to make. Heather has a few really cute images made solely from stamps.


I didn't have the SU "3 for you flower" punch for the hat, so I improvised using another flower punch.

Heather uses these Santa's on Scrapbook pages using the pop up beard for hidden journaling, but they also can be used as gift tags. I plan on making a bunch to hang on my tree.

Wednesday, November 19, 2008

Puffy Duck

I wanted to whip up a quick congratulations card for a friend who just announced she is pregnant with her second child. As well, I have a girlfriend coming over this weekend to make thank you cards for her sister in-laws baby shower and I thought this could also be a possible template.

I am having tremendous fun with the liquid applique, except it flattens very easily. I had to cut the yellow square and emboss it before applying the applique or the duck would get crushed. I am curious how well it will hold up in the mail too?

Details:
Stamps: Studio G Clear Stamps (duck), SU - Very Punny sentiment
Ink: SU - Summer Sun
DP: Provo Craft - Bitty Scrap Pad Backgrounds, yellow and white cardstock
Embelishments: Embossing folder - Frames, Marvy Liquid Applique, white ribbon

Saturday, September 20, 2008

Simply Silhouettes

I love these little Pocket Silhouettes by SU. They make such simply but elegant looking cards. I wet the watercolour paper slightly then brushed across the colour blending as I moved up.


I made two of the image inlays, the second with the image stamping outside the cropped white area, but it actually looks better with a bit of space between the stamped image and the border of the paper.

The progression of the colour in the background did not show well on camera, much nicer in RL.

Details:
Cardstock: SU - Chocolate Chip, Blush Blossom, watercolour paper
Stamps: SU - Pocket Silhouettes, Rubber Stamped sentiment
Ink: Cameo Coral, More Mustard, Summer Sunset