
The stamp is Stamping Bella: curlysurpriseabella (RAK from CardsbyKerry), the DP is DCWV - Blossoms & Butterflies with a little Stickles on the orange bow.

 Details:
 The only items I purchased for this project, all from the Dollar Store, were: the candy bowl, the "Come In... " sign, the cat, the broom and the green craft paint. The green tutu was from my daughters dress up bin, but was originally purchased from the dollar store. She has a nicer green one from last years dance recital so gave me permission to re-purpose this one for my project.
 The stand was built with 2x4's and spare wood. I had orange canvas type fabric on hand that I painted for the the boots and legs, which I then sewed together, painted with Acrylic craft paint and stuffed. *I wouldn't recommend making little swirly toes on the boots as I did - it was almost impossible to right side out the fabric once it was sewn.
 The stand or base was painted black and then using the direction found here from Dollar Store Crafts.com, I used school glue to crackle effect with green craft paint.
 I think I applied too much glue and green paint for the crackle effect, it started ooze down the base before drying. The oozing looks great for a Halloween, I would use less next time for a Home Decor project.
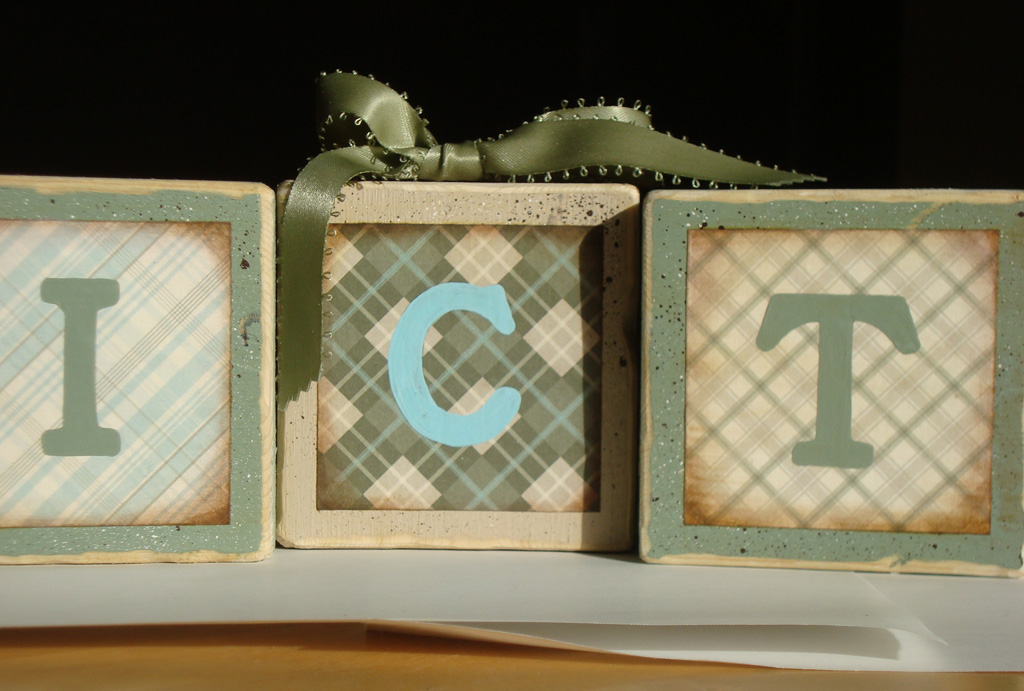
 I just love the bow detail.
 This was a super easy project. My husband cut the blocks for me from 2 x 4's. I painted them black, then used a Dremel tool to sand and rough up the edges. On white card stock I stamped the background with a Stampendous block stamp in black ink, then traced and filled in the letters from a dollar store chipboard alphabet set.
 Using AMM Chocolate Paper Stain, I aged and antiqued the whole square making sure to darken the corners and edges.
 Using home made Decoupage glue (3 parts white glue, to 1 part water), I fixed the finished card stock squares onto the blocks.
 I have often seen mini shelf wedges while out shopping and have thought of picking some up, but never got around to it. When I was inspired by You Craft Me Up!'s - "Wall Reveal", I of course was not able to find any shelf wedges any where - even Walmart because they are re-doing their home decor department. Finally at the last store I found a $ 5.00 wedge shelf in the Clearance bin, just the price I was looking for, especially since the non-clearance wedge shelves were going for $39.99 a piece.
 The grave stone was on Clearance at the same store I purchase the wedge shelf. The crow which I cut in half was purchased at Liquidation World for $ 3.00. Crow Frame tutorial found here at Dollar Store Crafts. I used the 'vintage newspaper' printed paper bag from my local Shabby Chic decor store as the background for my Creepy Crow Frame. I crinkled the paper then went over it with AMM paper stain. My crow unfortunately was hollow inside so I had a rough time gluing him in place. Believe it or not, white glue did the trick, I couldn't find my glue gun.
 The Canicula Embalming Fluid bottle is real. My father in law gave us this bottle he found at an antique bottle show many years ago. I never thought of displaying it as Halloween Art until now.
 I picked up this set by Studio G iClear a few weeks ago and have mulling around with a few ideas.
 It's now a postcard style invitation.
 Looks better then the free hand bricks on the mock up. I also have to tweek the Castle outline, I have noticed the it's not symmetrical. As well the light pink paper is from a random stack and is not quite thick enough quality for a postcard style invitation.
| Stamps: Looks like Spring, All Year Cheer II, Crosshatch |
| Paper: Riding Hood Red, random pink |
| Ink: Ruby Red, Black, Versamark |
| Accessories: Nestabilities, jewel, ribbon, rickrack, flower decals |
 I found the instructions for a tri-fold castle card here @ A Path of Paper. I used only the back and middle portions as well as scaling it all down in Photo shop in order to fit a 5 1/5 x 4 1/4 card face.
 My take on an even simpler version of the above card.
 Details:

 This is definitely not a card to put in the mail, there is much to much dimension to it.
 I finally got some new Copics to help blend with the stater kit I received for Christmas. Such fun. I can't wait to get some more - it certainly makes quick work of colouring in.
 Dustin Pike digital art Fish Fear, coloured with Copics, SU from my scrap drawer and computer generated sentiment.
 Stamping Bella beerafella, DCWV The Fall matchstack dp, SU riding-hood red card stock, Copics, glitter gel pen and Studio G sentiment.
 Pennyblack Bubbly Critters, DCWV Blossoms & Butterflies dp, SU card stock, Copics, glitter gel pen, Studio G sentiment and sticker gems.
 Details
 I used Flowerbug's Inkspot's idea of a tag slide inside the card to remove treats without destroying the card.


