Showing posts with label Halloween. Show all posts

Tuesday, October 18, 2011

Tiddly Halloween #69

I hope your not sick of Halloween yet, cause we have one more Halloween Is Coming Challenge #69 for you at the Tiddly Inks Challenge Blog. We would love to see your TI Halloween creations.

Meet Tiddly Inks - Alison the Witch. She was a prize from one of Tiddly Inks previous challenges. The winner was able to collaborate with Christy Croll on the image of their choice - neat huh! I love the image they came up with.


I used this Witch House by Make it Crafty, which was a prize I won from the Make It Colourful challenge blog. I wasn't sure how to colour thatch so went with my hair colouring technique, engh, why not! ;D

Hope you have a fab day, I am off to the Apple Orchard with my son's Junior Kindergarten class. My daughter's class is going too, so I get to see both of them today! :D

Oh, before I forget I followed the October Sketch For You to Try from i{heart}2stamp, and is entered in the following challenges:
Alphabet Challenge Blog - S is for Soon be Halloween
Do You Stack Up With Us - #41 Use Your Scraps
Fussy & Fancy - Fall or Halloween

Thursday, October 6, 2011

Deconstructing Jen N Tiddly #22

This is my second post for today, please scroll down for the Little Miss Muffet.

Deconstructing Jen Sketch Challenge #22 is being hosted by the lovely Christy Croll of Tiddly Inks, so I was so excited to play along.


I used Sugar Angel's Halloween from the new Sugar and Spice release found here. The paper combination is Too Cute to Spook DP by Bella Blvd..

Tuesday, October 4, 2011

Painted Tiddly Challenge

Boo! It's Tiddly Tuesday again. Today we are painting on our tiddly projects. Acrylic, watercolour, have at it with a little paint or a lot. Tiddly Inks Challenge #67 - Paint It Up!


I used my watercolour paints to make my sky and moon. Not lovin' it. It looked much cooler in my head. But my gorgeous BettyBelfry turned out just as I hoped.


I used a few different SVG's on this project for my scary silhouette, Spider Corner by SVGShop.com, Wicked Halloween Tree by My Time to Craft, Broken Fences by Creating in Carolina.

I attempted making my own DP. The smaller purple piece I ran through the printer with text, the other is stamped with a Studio G dotted circle stamp and I inked the edges. I also blinged up the spider web and spooky tree with Black Diamond Stickles.

I admit I don't love the finished project, but the process was fun.

This card is being submitted for the following challenges:
Tuesday Throwdown - #69 Halloween
Fussy and Fancy Challenge - Try a New Technique (watercoloured background)

Tuesday, September 27, 2011

Tiddly Batacular!

Scroll down to the previous post for Tiddly Inks Acrylic Challenge.

The MUST HAVE Sugar and Spice New Release is TODAY! These are a quick FAVE of mine, how fun and versatile, they can be every day naughty or nice or Halloween or even Angelic Christmas. I am so digging this Sugar Angel from the collection and couldn't help but paint her up all blue and sassy.


My daughter's sixth birthday is coming up just before Halloween and she has been asking for some Monster High dolls. She has become obsessed with them, in fact we purchased her Monster High Werewolf Girl costume this past weekend. Any way, I must have Monster High on the brain, because I coloured up this batastic beauty via MH style.

Deconstructed Sketch #20 over at Deconstructing Jen.

You can't tell by the photo, but I Glossy Accented her boots, shorts, eyes and bats, very shiny, and Stickled her wings.

The web svg border can be found here SensationalyChic Boutique. The edge are inked up with China Blue, Echo Park Splash

Monday, September 19, 2011

Sketch Challenge SFC116

It's sketch time at the Squigglefly Challenge Blog - Sketch Challenge SFC116.


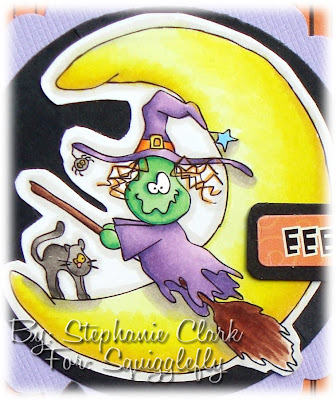
I grabbed this fantastic new digi called Witch Moon by Brian Lock available at The Squigglefly Store.

The DP are all Halloween scraps I have had for ages. The bat and the "Eeek" are from a scrap sticker set, and both the "Happy" & "Halloween" are dollar bin stamps.

Sew Many Challenge - Halloween
Stamptacular Sunday Challenge - #129 Just Saying

Squigglefly Rewards Program:

When you are going to make your first purchase at Squigglefly - sign up for the reward program and it tracks your purchases. When you reach $15.00 that you've spent you earn a free image! This even counts towards sets! You can let your points build up - they never expire. Did you already buy some images and you're just now finding out about the reward program? Don't worry! If you sign up for the rewards program, Squigglefly will let any of your purchases made during the same month apply towards your rewards!

Also, remember that we aren't all that great about backing up our images. If your computer crashes, you can log in to Squigglefly with your e mail and be able to download the images you've purchased again! They don't expire and there is no limit on the number of downloads. How many companies do that for you?

Wednesday, October 20, 2010

Witch Candy Stand - Trick Or Treat Dish

I started this project last week. I initially saw a Trick or Treat stand at a local craft fair, two years in a row. Both times I mentioned to my hubby that I could make one myself. I finally got around to it.

This is a GREAT Dollar Store project. Believe it or not it only cost me approximately $5.00 to make this Trick or Treat goody bowl stand. The majority of the parts I already had in my craft stash.
The only items I purchased for this project, all from the Dollar Store, were: the candy bowl, the "Come In... " sign, the cat, the broom and the green craft paint. The green tutu was from my daughters dress up bin, but was originally purchased from the dollar store. She has a nicer green one from last years dance recital so gave me permission to re-purpose this one for my project.

The stand was built with 2x4's and spare wood. I had orange canvas type fabric on hand that I painted for the the boots and legs, which I then sewed together, painted with Acrylic craft paint and stuffed. *I wouldn't recommend making little swirly toes on the boots as I did - it was almost impossible to right side out the fabric once it was sewn.

The stand or base was painted black and then using the direction found here from Dollar Store Crafts.com, I used school glue to crackle effect with green craft paint.

I think I applied too much glue and green paint for the crackle effect, it started ooze down the base before drying. The oozing looks great for a Halloween, I would use less next time for a Home Decor project.


I hot glued the bowl, boot/legs, broom and cat detail onto the crackled base and voila a cute witch stand for your Halloween Treats.

Sunday, October 17, 2010

Boo To You

Tired of putting out all the same old Halloween decorations, I decided to make new ones. Check out my inspiration found here at You Craft Me Up!

This was a super easy project. My husband cut the blocks for me from 2 x 4's. I painted them black, then used a Dremel tool to sand and rough up the edges. On white card stock I stamped the background with a Stampendous block stamp in black ink, then traced and filled in the letters from a dollar store chipboard alphabet set.

Using AMM Chocolate Paper Stain, I aged and antiqued the whole square making sure to darken the corners and edges.

Using home made Decoupage glue (3 parts white glue, to 1 part water), I fixed the finished card stock squares onto the blocks.

I also made a Halloween vignette in my ultra tiny front foyer, which isn't even large enough for a small side table. I am smushed up against the front door in order to take this photo.

I have often seen mini shelf wedges while out shopping and have thought of picking some up, but never got around to it. When I was inspired by You Craft Me Up!'s - "Wall Reveal", I of course was not able to find any shelf wedges any where - even Walmart because they are re-doing their home decor department. Finally at the last store I found a $ 5.00 wedge shelf in the Clearance bin, just the price I was looking for, especially since the non-clearance wedge shelves were going for $39.99 a piece.

The skulls in the martini glass are from the Dollar Store as well as the glass candle (pumpkin) holder, the spider webbing, ceramic pot, Spanish moss and the florist foam inside the pot. The branch is from my back yard. I haven't decided what to hang from it yet.

The grave stone was on Clearance at the same store I purchase the wedge shelf. The crow which I cut in half was purchased at Liquidation World for $ 3.00. Crow Frame tutorial found here at Dollar Store Crafts. I used the 'vintage newspaper' printed paper bag from my local Shabby Chic decor store as the background for my Creepy Crow Frame. I crinkled the paper then went over it with AMM paper stain. My crow unfortunately was hollow inside so I had a rough time gluing him in place. Believe it or not, white glue did the trick, I couldn't find my glue gun.

The Canicula Embalming Fluid bottle is real. My father in law gave us this bottle he found at an antique bottle show many years ago. I never thought of displaying it as Halloween Art until now.

Now I am itching to get my hands on a scroll saw to make some cut out lettering, but the blocks will do for now. As well as a Cricut, which has been on my MUST HAVE LIST for ages, I specifically stopped and showed one to my hubby when we were in Walmart recently, hoping he gets the HUGE *hint*!!!

Wednesday, October 28, 2009

SC252 Halloween

I purchased 4 new digi stamps from Pink Cat Studio, specifically to use with my new Copic starter set which was an early Christmas present from my adorable hubby. Thanks hubby.

My markers bled a little, I wonder if I need to try my SU-Whisper White instead? Any thoughts, what paper works best for Copic colouring? I am stilling also learning the technique and need to get myself 2-3 markers of the same colour family - to do better blending. I also am not terribly impressed that that the starter kit comes with such dark values, when it seems that the light shades are the most important - at least that's my impression from all the tutorials I have watched on You Tube.

The layout was today's Sketch Challenge over at SplitCoastStampers, challenge # SC252.

Details:
Stamps: Pink Cat Studio Digi stamp: Itty Bitty Betty - Yummy Frogs
Ink: Copics
Paper: Kelly Panacci: Halloween Stripes, Halloween Circles, Orange Mini Dots, Imaginisce spider border
Accessories: Spellbinders: scallop rectangle, Sandylion sticker sentiment

Monday, October 26, 2009

Trick or Treat Goodies

I made these little Halloween treats for my daughters JK class. Due to all the food allergies kids have now days, I didn't want to send in any food treats, but happened across these little Crazy Eights/Old Maid card-game sets sold in a package of 24. Her class is only 19 - hurray!

These were fairly easy to make, I stapled together a one inch strip of Halloween themed cardstock around each Game-set then mounted the scalloped edge image onto the stapled portion. I wanted to keep it easy for the kids to access the games or all my hard work would get demolished in the attempt to free the gift. Who am I kidding, they are going to get destroyed any way.

It would have been even easier to make this project if I had the right size punches. All in good time though. I have debated whether to purchase the one or two needed punches from SU or buy the Scallop & Circle Spellbinders individual sets. Can't make up my mind though. It's a money thing.
Details:
Stamps: SU - Batty for You
Ink: black, green, indigo, orange
Paper: left over Halloween scraps
Accessories: colluzle, scallop punch, stampler

Wednesday, September 3, 2008

Haunting Good Time

It's that time of year again. I am trying to be good about not buying any large stamp sets, but had to get in on all of the Halloween fun so I snapped up a few of the Michael's Dollar-fifty stamps last week.


Details:
Indigo Versamark pigment
White Color Box pigment
Versa Magic Chalk - Purple Hydrangea
Sandylion Dp - Halloween Circles
various cardstock
various ribbon

Tuesday, August 12, 2008

It's Halloween Winnie the Pooh

As I posted earlier, I am desperately trying to catch up on my kids scrapbooks, so I may not be posting many cards for a while.

I actually accomplished 2 pages in one night which is a miracle for me. It usually takes me all night for just one page. I know I have read that others knock off a page in an hour, not so for me. Maybe I over think it, don't know.

I was 3 Halloween pages behind. One page for 2006 and 2 for 2007. My daughters 2006 page I had all planned out in my head before starting, it was inspired by a page I saw on Penny Black found here.


However, it was an interesting challenge to use the same paper for my son's 2007 page, trying to make the two pages look completely different. I like both pages, but I think my son's turned out better. Funny how no pre-planning yielded a better result.


DP - Sanylion (Kelly Panacci): Halloween Stripes, Halloween Circles, Orange Mini Dots
Reminisce: Pumpkins for Sale and Spiders Web
SU: Dots & Dashes, purple cardstock

Stickers: Sandylion